It’s the festive season, it’s time to get back to our creative roots, put on some Boney M, pour yourself a Pimm’s and lemonade and conjure up a few original and surprisingly inexpensive ways to decorate our trees and homes this year.
Alternative Christmas tree and decorations can be one of the most creative, interesting ways of expressing yourself. Here we focus on a few quick ideas for decorations which have a modern twist, and which follow an eco-friendly trend.
Even though we don’t get to experience a wintry wonderland over the festive season there is no reason not to celebrate with a few traditional pieces on your tree such as:
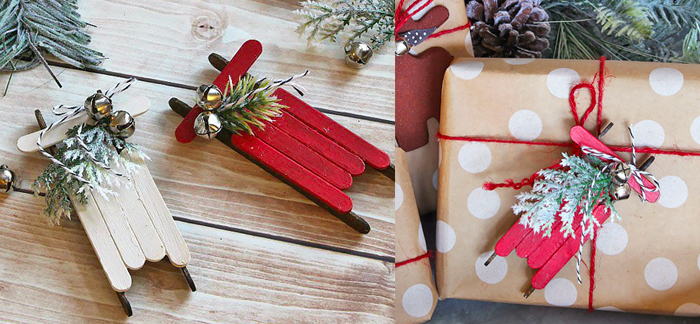
Mini sled
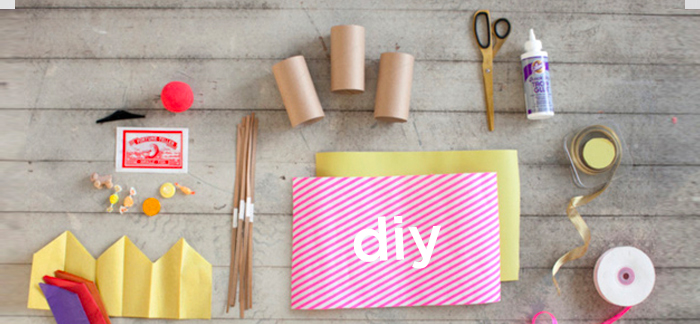
Here’s what you need:
- Ice-cream sticks (regular sized & mini)
- tape
- strong glue
- paint
- string or ribbon (something to make the sleigh pull out of)
Here’s how you make them:
- Take 4 of the sticks and place them side by side. To make the sleigh shape, the 2 center sticks should be about 2.5 cm offset from the edge sticks. After you have a sleigh shape made, use a piece of tape to hold the shape together. (see Photo 1)
- Cut one of the mini sticks in half. Flip the taped sticks over so that the tape is face down. Carefully put glue onto one of the mini stick halves and lay it across the “top” of the other sticks. (See Photo 2)
- Put glue on the other half of the mini stick you cut, and lay it across the “bottom” of the other sticks. Once the glue dries, make sure to take the tape off the other side of the sticks. (see Photo 3)
- Put two big dots of glue (one on each mini stick half), and place the skinny edge of the regular sized stick into the glue. You may have to hold the stick in place for a few seconds while the glue hardens so you don’t end up with lopsided sleigh tracks. (see Photo 4)
- Repeat the same process for attaching the other sleigh track.
- After all the glue has dried, then it’s time to paint! We suggest using acrylic paint to cover the entire sleigh, including the bottom of the sleigh and sleigh tracks.
- When the paint dries, you can put the final touches on the sleigh. For the sleigh pull, cut a short piece of string and glue each end to the underside of one of the two edge sticks.
Christmas Snow Globe
Next stop - creating a winter wonderland in a jar. The shimmering magic of snowfall is always transfixing, even if just inside this classic toy. And the good news is it's relatively easy to make.

Here’s what you need:
- A clean empty jar
- Plastic or ceramic figurines (metal ones are prone to rust)
- Mini synthetic evergreen trees (available at flower-supply shops)
- oil-based enamel paint
- sandpaper
- strong bonding glue
- distilled water
- Glitter
- And glycerin (available at pharmacy’s).
Here’s how you make them:
- If the jar lids are not in seasonal colours already, paint them with oil-based enamel paint. Sand the inside of the lid until the surface is rough. With clear-drying glue, adhere the figurine to the inside of the lid, and let it dry.
- Fill the jar almost to the top with distilled water; add a pinch of glitter and a dash of glycerin to keep the glitter from falling too quickly. Don't add too much, or the glitter will stick to the bottom of the jar when it's flipped. Screw on the lid tightly, being careful not to dislodge the figurine. Turn the jar over and back again - and let it snow.
Deck of Cards ornaments
A novel idea is to decorate your tree with photos of your family and the people you love, it’s worth the effort. We loved this one using a deck of card, it’s easy, extremely adorable and something completely different….
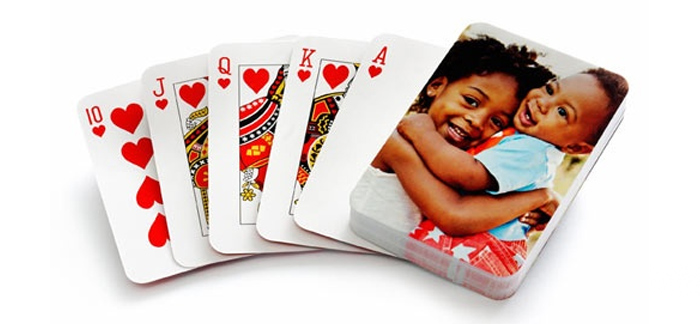
Here’s what you need:
- Deck of playing card
- Photo
- Hobby knife
- Scissor
- Glue
- Hole punch
- Ribbon
- Glitter glue
Here’s how you make them:
Using the knife, cut out the middle of the playing card so it becomes a frame. (Started with the knife then switched to scissors as it will be easier)
- Lay playing card frame over your picture and trim photo excess around the frame edges.
- Glue card frame onto picture.
- Glue another playing card (face down, showing back of card) to the back of the frame/photo combination making a sandwich.
- Make other playing card photos if you would like.
- For the cover, simple use the back of a playing card and with glitter glue write the year. Let it dry.
- Finally, stack the photos in the order you would like with the cover first. Hole punch each card in the correct corner. Tie together with a ribbon and
Christmas Crackers
And last, but by no means least is our favourite decoration which will give your Christmas the bang you are looking for, home-made crackers. Cheap, easy and far more interesting than any you’ll buy:
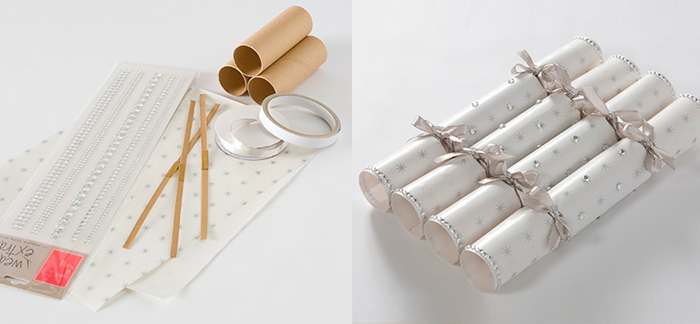
Here’s what you need:
- Toilet paper roll tube
- Cracker snap
- Glue/Clear tape
- Tissue Paper and/or wrapping paper
- Ribbon, string, or other material for tying
- Stuffings, such as lip-sticks, nail polish, fridge magnets, torches, perfume, any fun item that is small enough to fit inside a toilet roll
Here’s how you make them:
- Cut out a piece of wrapping paper and a piece of tissue paper (A4 in size).
- In the center of the tube, tape a cracker snap inside. Make sure it is centered.
- Stuff your cracker. If you have small pieces (like sweets), you can also stuff a few pieces of tissue paper into the ends of the tube to keep everything from flying out when the crackers are opened.
- Roll up your cracker in the tissue paper. Start at one corner and work to the other side, glue the far corner which is now rolled tight against the toilet roll to the tube. Repeat using the wrapping paper.
- Twist and tie. Gently twist the tissue paper close to the tube and, using string or ribbon or whatever you’d like, tie off one end of the cracker. Repeat with the other side. Tying close to the toilet paper roll tube keeps the tension better for pulling the cracker apart.
- And Pull!
You need look no further than Pinterest for 1000’s of fun décor concepts to get stuck into. The secret is to keep it simple and not to overdo it. We wish you many happy hours of creating memories, after all isn’t that what Christmas is all about.
Date Published: 11 December 2017