
Let’s enjoy doing family! Enjoy the crafty mayhem and celebrate our family members ‘unique’ designs. Let’s forget about that perfect result and enjoy making family memories. It’s time to unwind, kick back and enjoy the simple joys of family time.
Here are a few Christmas Décor ideas that the whole family can enjoy.
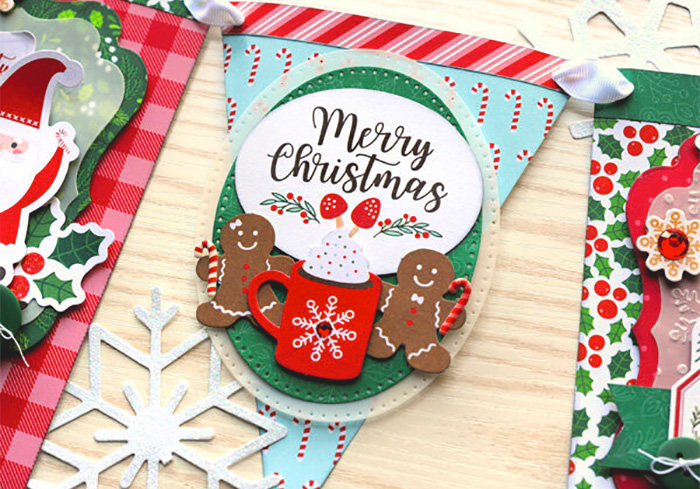
Christmas Bunting
A fun family afternoon activity of cutting and sticking that can make a lovely high impact piece strung up in the lounge or outside on the deck. Bunting is also a lovely project that can be folded up after Christmas this year and then taken out again next year and added to.
You will need:
- Sheets of A4 white or coloured paper
- The front of old Christmas card
- Christmas themed wrapping paper
- Optional extras like: glitter, stickers, ribbon, and scraps of coloured and patterned paper.
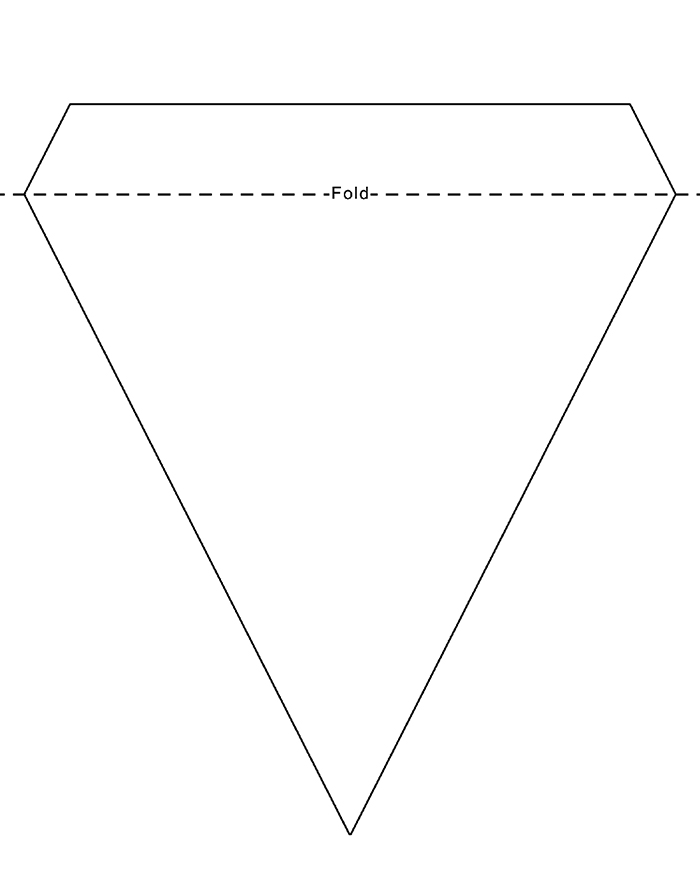
Now to get started. First decided on the size triangle that you would like for your bunting. Once you’ve drawn your triangle with its point facing down, draw a rectangle running parallel at the top line of the triangle. Snip off the ends of your rectangle so that your bunting resembles this template Once you have prepared a few triangles and cut them out, you can start the fun of decorating.
To string up your bunting glue your string on the back of your triangle just below the fold line. Fold the flap over your string and glue it down. Repeat until all your bunting triangles are attached to the string.
Cinnamon ornaments – air dried
Yes, you read it correctly, this easy to make dough will make your home smell of delicious cinnamon and it won’t require cooking. The ornaments take approximately 24 hours to dry depending on their thickness. Once dry they’re ready to be painted - using acrylic paint. A batch of dough makes roughly 10 ornaments with cookie cutters.

What you’ll needed:
- 1 cup of flour (plain)
- ½ cup of salt
- ½ cup of cinnamon
- ¾ cup of very warm water
- Wax paper is advisable
- Cookie cutter
- Acrylic paints (optional)
In a large bowl combined the 3 dry ingredients, then carefully add the very warm water, and mix well.
Lightly dust your surface and fingers with some flour. Remove the newly formed dough from the mixing bowl and place it on your floured surface, begin kneading. After a few minutes of kneading your cinnamon ornament dough will be ready to roll and shape.
At this point, please remember to insert a whole large enough for your ribbon or string to fit through once you have shaped your cinnamon ornament on the wax paper. Working on wax paper is advisable so as to easily remove your ornament once dry.
Once your ornament is dry and a ribbon threaded imagination will be your limit. To seal unpainted ornaments, use a clear finishing spray or Mod Podge (found at any craft shops). When designing your ornaments with acrylic paint be sure to add some cinnamon to your paint as to not dull any of its festive fragrance.
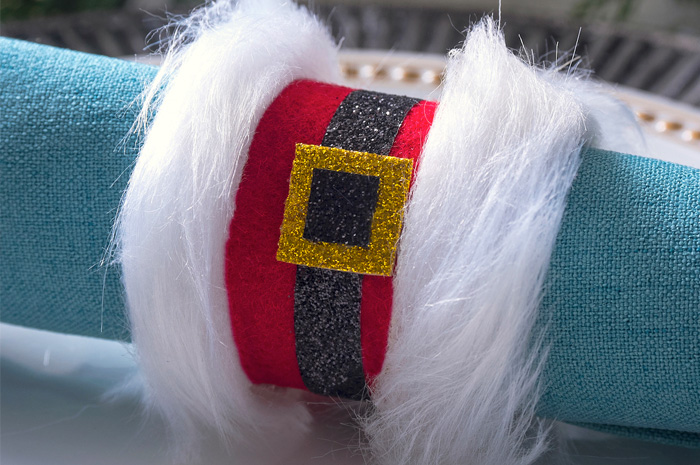
Santa Serviette rings
At this time of year everyone is pulling in their belt. These budget serviette rings will be a delight to both your pocket and your Christmas table, and they begin with the humble toilet roll which abounds in every household.
You will need:
- 2 empty toilet roll (makes 6 Santa Serviette Rings)
- Cotton wool balls (one per ring)
- A square of red felt (will be enough for 6 or more)
- Thin black ribbon
- The buckle, one sheet of yellow card/paper or even the card from a spare toilet roll
Let the fun begin! Start by cutting your toilet roll in three equal parts. Keep in mind that you want your cotton wool to overlap the edges of your toilet roll, thereby enlarging and softening the edges of your Santa Serviette Ring.
When you’ve cut the rings unwind a ball of cotton wool and secure it to the toilet roll. Once secure stretch out the cotton wool until it overlaps the edges. Next cut and secure your red felt. Now that Santa’s clothes are in place it’s time to make your buckle, cut a rectangular shape out of card then cut two slits by which to thread your ribbon through. Lastly thread your black ribbon through the buckle and secure it around your Santa Serviette Ring - Voilà!
These little serviette rings are sure to make a big impression around the Christmas table.
A gingerbread house that will stand the test of time
Deciding to undertake the making of a magnificent gingerbread house is both fantastically exciting and very daunting, luckily, we have some tricks up our sleeves that will transform a novice baker into a master builder.
Ingredients needed:
- 1 cup butter, cold, and cut into small cubes
- 2 1/2 cups lightly packed dark brown sugar for a festive taste
- 2 large eggs, cold
- 1/2 tsp salt
- 1 tbsp dried ground ginger
- 2 tsp ground cinnamon
- 1/2 tsp ground cloves (optional)
- 1/2 tsp allspice/pimento (optional)
- 4 cups self-rising flour
Method:
- Preheat your oven to 170deg
- Mix the cold cubed butter and sugar with an electric beater on medium speed for about 3 minutes, until combined but not quite creamed.
- Next add egg, salt, ginger, cinnamon, clove, and allspice to your mixture, mix for one minute.
- If you have a ‘hook’ like fitting for your mixer now is the time to change fittings as this will make mixing the dough a lot easier. While on your lowest speed begin slowly adding your flour. Once all the flour has been added, remove the dough and knead by hand.
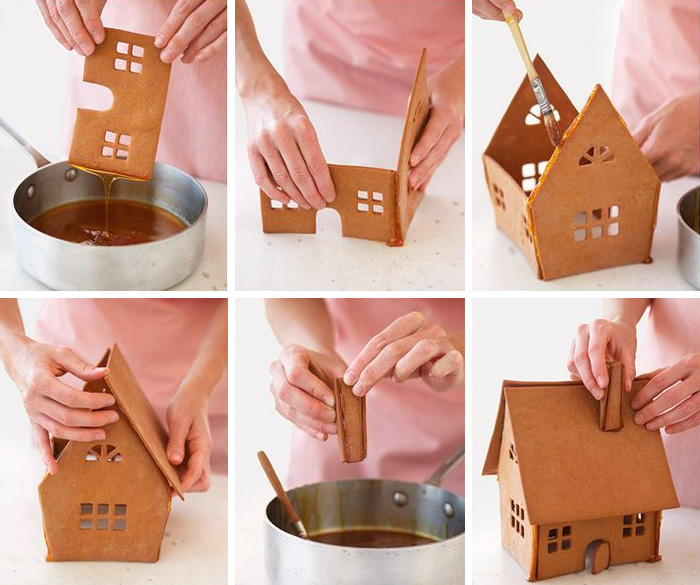
- Roll out your dough on baking paper, to make rolling easier put the portion of dough that you are wanting to roll in between two pieces of baking paper. The dough will rise and spread when baked, therefore roll it thinner than you would like and cut your walls and roof sections smaller than desired. A tip is to plan out your walls, roof and chimney on a separate piece of paper. Cut these pieces out and once you are happy that they will fit together nicely use the pieces of paper as a template on your rolled out dough. Don’t worry if your pieces don’t come out to plan as you can always cut your pieces to size while warm.
- Bake at 170deg for 10-15 minutes.
Let the real fun begin. Now for the part that used to be difficult… keeping your house all stuck together. Key word toffee! Melt a cup of sugar in a small sauce pan with a tablespoon of milk to get the caramelising started. Be careful as when the sugar gets too hot it can bubble over - sugar burns are no joke. Dip the sides of the house that you are wanting to stick together in the toffee mixture and set them aside. At this point, use spice jars to prop up your pieces and keep them together while the toffee dries. Once your house has been stuck together it’s time to gather the kids to come and decorate.
If the full gingerbread house is too much PT but you’d love to have the experience of decorating with the kids then simply use some tennis biscuits and use the above toffee idea to glue your walls and roof together.
It is said that the best things in life are free and while ingredients and art supplies do come with a price tag, the simple joy of having the family around the table making Christmas memories together will last through the years.
Date Published: 01 December 2021